
A new order is created in the "Create order" window (Fig. 33).

Fig. 33. The "Create order" window
The "Create order" setup window consists of the following blocks:
1. The block of work with the order.
This block consists of two bookmarks:
"Items in order" is a block that displays the items added to the order, as well as a panel of buttons for working with the created order.
"Guest profile" is a block for displaying guest data (not implemented in the current version).
2. A panel with buttons for working with the order.

- order cancellation

- adding a comment to the order

- entering the time of readiness and time of delivery of the order, setting the sign of a temporary order

- choosing the type of delivery

- recalculation of the order accepted at the point in the center; when recalculating, sticks and sauce can be added automatically in response

- saving the accepted order in the collection of orders at the point
3. Menu.
The area where the product catalog is displayed.
4. Switch panel between Mainlist (main menu of dishes) and Quicklist, as well as catalog search.
A block designed to quickly switch between a list of all dishes and a list of the most frequently ordered dishes.

Clicking on the magnifying glass opens a search bar for positions throughout the catalog. When you enter letters, the screen displays positions in which there are matches for the entered characters.
5. A line indicating the level of the catalog of dishes.
The categories section is displayed in this row. In the same line there is a filter for selecting positions by price or alphabetically (Fig. 34):
Popular (Featured).
From cheap to expensive (Price: Low to High).
From expensive to cheap (Price: High to Low).
From A to Z (Aa - Zz).
From Z to A (Zz - Aa).
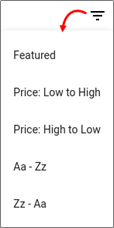
Fig. 34. Filter
To create an order:

1. Go to the "Create order" window by clicking on the image of the sheet with a plus sign (Fig. 35).
2. Select a category on the "Main list" tab and click on it. A list of dishes included in this category will open.
3. Select dishes by clicking on them to add to the order. The added dishes will be displayed on the left on the "Items in order" tab.
Note: the quantity of one item in the order varies:


using the - and + buttons (Fig. 35, uk. 1)
by adding one position several times (in this case, each added position of one dish will be recorded in a separate line in the order) (Fig. 35, uk. 2).

To remove an item from the order, click the cross (Fig. 35).
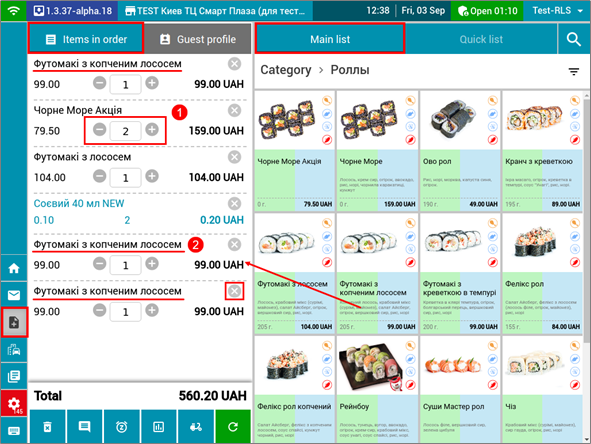
Fig. 35. Creating an order
4. To quickly find and add the most frequently ordered dishes to the order, use the "Quick list" list (Fig. 36) by clicking on the name of the bookmark to open it.

5. Click on the message image to add a comment to the order (Fig. 36).

6. Click on the stopwatch image to enter the order readiness time and the order delivery time (Fig. 36), as well as set the time sign of the order if necessary.

7. Click on the graph image and enter the promo code (discount), if available and applicable to the order being created (Fig. 33).

8. Click on the moped image to add the delivery type and delivery address to the order being created (Fig. 36).

Fig. 36. The list of dishes "Quick list"

9. After the order is created, click the update button to recalculate the order in the center.
Note: Every change in the order requires a recalculation in the center.

10. As a result of the recalculation, automatically added items (sticks and sauce) with an indication of price and quantity may come in response from the center. Such items are highlighted in the order in color (Fig. 36). And also the refresh button will change to nine squares (confirm) (Fig. 37).
11. Click on this button to add an order to the order collection. The created order will be displayed in the "Order list" window with the status "New".

Fig. 37. Synchronized order with a call center and a button to add to the collection of orders


After an order is created and added to the collection of orders on the menu bar with navigation buttons, the button changes color to red, while the number indicates the number of orders in the "New" status (Fig. 37).
To add a dish to an order:
1. In the "Create order" window, select a category and click on it. A list of dishes included in this category will open.
2. Select dishes by clicking on them on the blue area (fig. 38, uk. 1) to add to the order.
3. The selected dishes will be added to the order and displayed on the left on the "Items in order" tab (Fig. 38).


4. In the list of added dishes on the "Items in order" tab, use the + and - buttons to specify the number of servings of the dish.
or
1. In the "Create order" window, select a category and click on it. A list of dishes included in this category will open.
2. Click on the green area (fig. 38, uk. 2). The dish card will open, in which:
the name of the dish and its composition are indicated (fig. 38, cc. 3);
additional parameters are indicated: cooking time ("Cook time"), weight, calorie content and energy value of the dish (fig. 38, cc. 4);


3. In the dish card that opens, set the number of portions of the dish using the + and - buttons (Fig. 38, cc. 5).

4. Press (fig. 38). The selected dish will be displayed on the left on the "Items in order" tab (Fig. 38).

Fig. 38. Ways to add a dish to an order

To add a comment:
1. Click on the button with the message image to open a window for entering a comment (Fig. 39).
2. When you click on the input field, a keyboard opens with which to enter a comment.

Note: To change the keyboard layout, press (Fig. 40).

3. Click Save (Fig. 39) to save the comment in the order.
4. As a result of the performed actions, the "Create order" window returns with the order being created.

Fig. 39. Adding a comment to the created order

Fig. 40. The button for switching the keyboard layout
When creating an order, it is possible to specify the time for which the order should be ready and the time at which it should be delivered.
The activated time sign indicates that the order must be ready and delivered at the specified time.
To add the date, time of delivery and readiness:

1. Click on the stopwatch, a window will open to set the date and time of delivery ("Delivery time"), set the time attribute of the order. This window also displays the date and time of readiness ("Readiness time").
Important!The date and time of readiness are not edited.
2. To set the delivery date, click on the field with the delivery date ("Delivery time") and, in the calendar that opens, select the date (Fig. 41).
3. To set the delivery time, click on the delivery time field and set the required time (Fig. 42)

4. Click Ok (fig. 42) to save the selected time.

When you click Cancel (fig. 42), the selected time is not saved.
5. Check the box next to "Time mark" if the order should be ready and delivered at a certain time.

6. Click Save to save the changes and close the time setting window.

Fig. 41. Adding the delivery date

Fig. 42. Adding delivery time
To enter a promo code (discount):

1. Click the promo button, a window will open for entering a promo code (discount) (Fig. 43).
2. When you click on the input field, a keyboard opens with which you can enter a promo code (discount).

3. Click Save (Fig. 43) to save the promo code (discount) in the order.
4. As a result of the performed actions, a return to the "Create order" window with the created order occurs.

5. The promo code (discount) is applied after clicking on the update button (Fig. 43). The application of the promo code (discount) is displayed on the amount by position and in the amount of "Total" (Fig. 44).

Fig. 43. Adding a promo code (discount) to the created order

Fig. 44. Applied promo code (discount) to the order
When adding a promo code (discount), it is possible to delete or edit it.
To edit the promo code (discount) in the created order:

1. Click on the promo code button, the "Promo code" window will open (Fig. 45).

2. Click Edit to edit the promo code (discount) (Fig. 45).
3. Click on the promo code (discount) entry field. A keyboard opens with which you can edit the promo code (discount).

4. Click Save to save the modified promo code (discount) in the order (Fig. 46).
5. As a result of the performed actions, a return to the "Create order" window with the created order occurs.
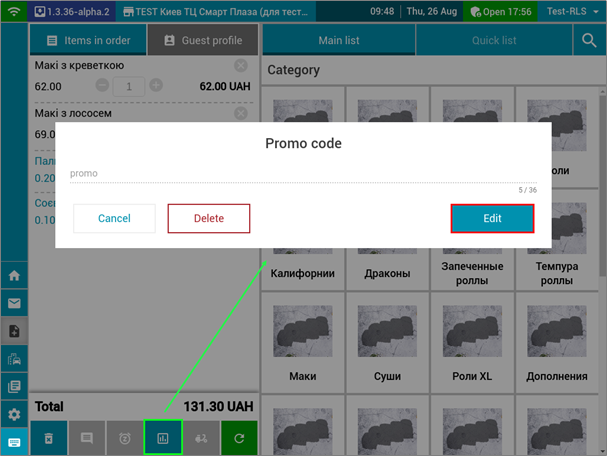
Fig. 45. Editing the promo code (discount) in the created order
To remove a promo code (discount) from an order being created:

1. Click the promo code button, the "Promo code" window will open (Fig. 45).

2. In the window that opens, click Delete (Fig. 45).
3. As a result of the actions performed, the window for entering the promo code (discount) closes and returns to the order creation form.
To add a delivery type and address:

1. Click . The "Delivery method" window opens.
2. Select the type of delivery "Pick up" (pickup) or Delivery (delivery) (Fig. 46, UK. 1).
3. When choosing the type of delivery "Delivery" (delivery) enter your shipping address (Fig. 46, UK. 2) using the keyboard that opens when clicking the field "Delivery address" ("Enter shipping address"). Enter the street name in whole or in part, and then select the appropriate option in the drop-down list (fig. 46, cc. 2).

To specify the delivery address, click on the geo icon, after which the map will open. To zoom in or out of the map, press +/-.

Set the label on the map according to the exact delivery address and click Select, after which the delivery address will be displayed in the "Delivery address" field (Fig. 47).

When you click the Cancel button, the card is closed without saving the entered data.
Note: To clear the "Delivery address" field, click the cross (Fig. 46).
4. Enter the guest's name in the "Guest's name" field (fig. 46, uk. 3).
5. Enter the guest's phone number in the "Guest's phone number" field (Fig. 46, uk. 4).

6. Click Save to save the entered data in the order (Fig. 46).

When you click on the button (Fig. 46), the entered data in the "Delivery method" window is cleared.
7. As a result of the performed actions, the selected type of delivery will be displayed in the extended order form in the "Guest" block (guest information) (Fig. 49).

Important! The "Delivery address" and "Guest's phone number" fields are required. Otherwise, the fields are highlighted in red, as well as the Save button (Fig. 48)

Fig. 46. Choosing the type of delivery

Fig. 47. Choosing a delivery address on the map

Fig. 48. Incorrect delivery data

Fig. 49. Display of the selected delivery type in the order
To delete an order that is being created:

1. Click on the basket image (Fig. 50). The "Items in order" block will be completely cleared (Fig. 51).

Fig. 50. Deleting an order

Fig. 51. The "Items in order" block after deleting the created order